Archive for wargaming on a budget

Orkheim Ultraz: Don’t feed the troll, pt. 2

Posted in Blood Bowl, Conversions, paintjob with tags , , , , , , , , , , , , , on November 16, 2016 by krautscientist

It’s been a rather long while since I have last talked about the Orkheim Ultraz, my Orc & Goblin team for Blood Bowl. And as luck would have it, I now have a new model to show, right around the same time that GW is putting their redesigned Blood Bowl starter box up for super-secret sneak-peek pre-order 😉

This is no clever strategy on my part, however, but rather a bit of a happy accident, because I have wanted  to get today’s model painted up for ages — ever since I picked it up in a secondhand deal, back when my dear FLGS was still alive and kicking (*sniff*). I am referring to this guy:

Lucky purchase (2)
Most of my Orc Blood Bowl team was assembled using leftover models and bitz from an old WFB greenskin army project that never quite materialised. But while that gave me enough parts for most of the boyz, I needed a suitable model to serve as a big guy in the team. And I was fortunate enough to find the model you see above in the deal bin at my FLGS one day. The model was originally a part of the “Battle for Skull-Pass” starter set for Warhammer Fantasy:

skullpass-boxed-set

Made of only two parts, it’s a pretty cool (if slightly dated) example of the time when GW started to do really clever things with their snap-fit starter box models. At the same time, the troll also struck me as a brilliant base model for a Blood Bowl player: The pose is already perfect, and it only took a few orc armour plates to mock up some reasonably convincing football armour for him.

So anyway, to make a long story short: I’ve had this guy for years now, and when I recently sat down with my good friend Annie for a painting session, it was actually a matter of honour to finally complete the model (keep in mind that Annie was the one who got me involved in Blood Bowl in the first place).

I did some research online to decide on a general approach for painting the troll, but when the time came to actually get started, I surprised myself by going for a pretty spontaneous, fairly loose painting recipe. This made for a very entertaining painting session with lots of impromptu experimentation. At the same time, I also tried my best to both make the troll look suitably toadish and swamp-ish while also trying to maintain some visual coherency, in order to tie the model together with the rest of the team.

So here’s what I came up with:

blood-bowl-troll-2
blood-bowl-troll-1
blood-bowl-troll-3
blood-bowl-troll-4
I am really happy with the finished model, and it’s a great feeling to have finally completed this particular piece. And even though the troll’s a fairly old model at this point, I still think he holds up rather well, to be honest. Here’s a comparison picture showing the troll next to one of my Black Orc Blockers and one of my Orc Blitzers:

orkheim-ultraz-2016-4
The photo shows the progression of skin tones and model sizes between the various team members, from the standard orcs to the bigger (and ever so slightly darker-skinned) Black Orcs. And there’s the troll, of course, serving as the biggest model in the team. Granted, he could be bigger, but I think the model has loads of character and makes for a perfect addition to my Orkheim Ultraz.

While the models are quite different in size and bulk, the dented and scratched red armour still manages to pull them together into a visually coherent theme. In fact, I really like the look of the finished team. So here are the Orkheim Ultraz in their 2016 incarnation:

orkheim-ultraz-2016-6
Back when I first started painting the army, some of the concepts and designs from the Blood Bowl video games really helped in developing the look for my team. And I think there’s a clear resemblance between my models and the look of the greenskins from the current Blood Bowl game — even if GW’s new models are arguably even closer to this particular look:

pc-blood-bowl-orc-team

Oh, and here’s the Orkheim Ultraz with their star-player, based on one of GW’s clamshell characters for WFB/Age of Sigmar:

orkheim-ultraz-2016-5

It is with a certain feeling of bemusement that I realise that this team might actually be the closest thing to an actually finished hobby project I have – at least where the last decade or so is concerned. And even so, I have ideas (and bitz) for at least half a dozen additional models knocking about, from two more Black Orc Blockers to some fans and a “Kit Git”. We’ll see…

Speaking of fans, however, let’s not forget the amazing Fan-Troll Annie created for my birthday two years ago:

Fan Troll (12)

Anyway, while I didn’t really plan to return to this project right in time for the new Blood Bowl, building and painting some models for the Orkheim Ultraz always provides a nice occasion to return to the more humorous side of GW’s intellectual properties. Plus it feels good to channel the spirit of the WFB greenskin army I could never finish every now and then 😉

So that’s it for today. It goes without saying that I would love to hear any feedback you might have! And, as always, thanks for looking and stay tuned for more!

orkheim-ultraz-2016-3

Striking a rich vein

Posted in 40k, Blood Bowl, Chaos, Conversions, Inq28, Inquisitor, old stuff, Orcs & Goblins, Pointless ramblings, Totally worth it with tags , , , , , , , , , , , , on September 30, 2014 by krautscientist

Late last week, the most wonderful thing happened to me: While browsing through the stuff at my FLGS, I found out that the owner was currently selling two huge lots of assorted miniatures and bitz: One of those lots came from a former hobbyist who wanted to get rid of the last part of his collection, while the reason for the other lot being sold was, sadly enough, its owner having passed away. Anyway, the owner of my FLGS found himself in the (temporary) possession of two huge piles of models — and it shouldn’t surprise you that I was very eager to have a look at all of that stuff.

This provided me with one huge moving box and several smaller shoeboxes of stuff to sift through, which was already brilliant fun in itself: With the internet so full of collectors, professional sellers and general information as to the worth and availability of miniatures these days, finding such a hoard of stuff has become increasingly unlikely, and so the simple act of digging through the piles of models alone was an experience to savour! Most of the models came from WFB, but there was such a mass of different models (and factions) present that it took quite a bit of discipline not to just buy the whole thing outright.

Anyway, I tried to reign myself in and only dragged away about a shoebox’s worth of stuff. And whether or not my haul was all that spectacular surely lies in the eye of the beholder. But I went home utterly content, I can tell you that much 😉

Anyway, let’s take a look at the best parts of my haul (and also at the provisional ideas I have for this stuff), alright?

First up, tucked away in a plastic bag labeled “Vikings” was most of the dwarf army from the WFB “Battle for Skull Pass” boxed set from a few years back:

Lucky purchase (1)
While some of the regular models are missing, all the special characters, standard bearers, champions and musicians are still accounted for. Plus there are also the little additional bitz and bobs and terrain pieces. I basically picked this up as a bonus, but I have a sneaking suspicion that I might already have a new home for these guys (Michael, if you’re reading this: Make sure to bring a big enough suitcase, when you’re in the area again, okay? 😉 ).

I also picked up two more pieces from the same boxed set:

One, the plastic troll accompanying the Night Goblin army:

Lucky purchase (2)
This was actually one of the high points of the purchase for me, because this guy will look perfect as a troll player for my orcish Blood Bowl team, the Orkheim Ultraz  — as a matter of fact, you can already see the first parts of his Blood Bowl gear in the picture above. Nothing’s glued together yet, but I already like where this is going!

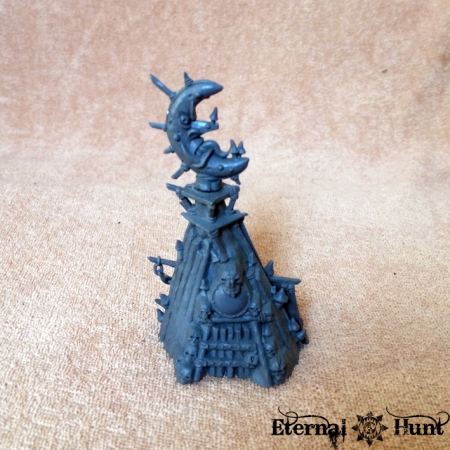
Two, this strange shaman’s tent/tree trunk hut:

Lucky purchase (3)
This might come in handy for my Blood Bowl team or for the Mordheim Orc warband I’ve been planning for a while. Come to think of it, including terrain pieces like this in the starter boxes was a really neat touch! They should do that again!

Upon closer examination, it becomes obvious that the sculpts and level of detail for starter box minis have increased dramatically since these models were released. But I still like them well enough, and finding them all together like this without a hassle certainly was a nice surprise!

While we are on the subject of greenskins, I also bought this assortment of brilliant goblins and snotlings:

Lucky purchase (4)
These are part of the still available Doom Diver Catapult — as a matter of fact, pretty much the whole catapult was included in the deal, although the greenskins themselves are definitely the stars of the show! Again, these will probably be used for Mordheim or Blood Bowl (the winged goblin would be perfect for the latter…).

Like I said, most of the stuff available was from WFB, but I did manage to find a 40k treat or two. First up, a small pile of Tyranid nuts and bolts that, while not all that impressive in and of itself, will come in handy for a future INQ28 project of mine…

Lucky purchase (5)
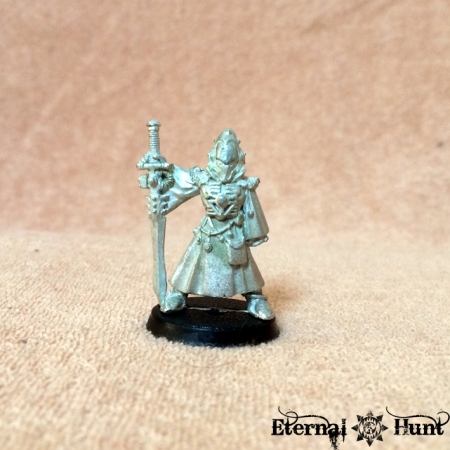
And there’s this lovely OOP Eldar Warlock from the 90s, sculpted by Jes Goodwin. It’s trange: Even though I have always loved Jes’ Eldar models to bits, I have never owned any of them, so picking this guy up was an absolute no-brainer:

Lucky purchase (6)
And, last but not least, a lucky find at the bottom of a box of bitz: Exactly half a Delphan Gruss model from Inquisitor:

Lucky purchase (10)
This guy may actually become my first (and, quite possibly, only) foray into the world of Inq54 — just watch this space 😉

And as for the WFB universe, there are some final highlights to share:

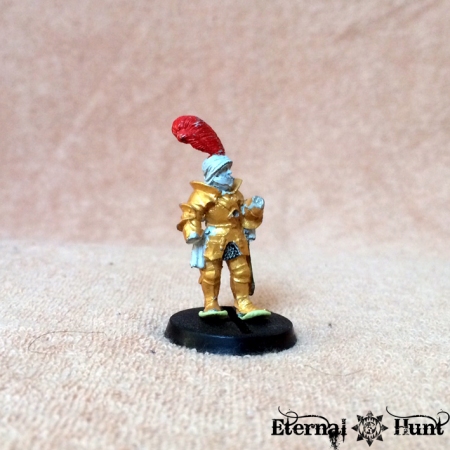
First up, this guy (from one of the old WFB mercenary regiments, if I recall correctly):

Lucky purchase (9)
I keep racking my brain for a way to make this guy into an INQ28 character — maybe a member of a particularly archaic Astra Militarum regiment? I am very open to suggestions 😉

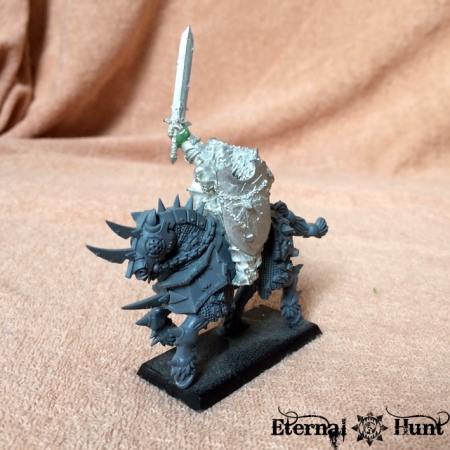
Then there are three of the 6th (?) edition metal chaos knights:

Lucky purchase (7)
Pictured here is their champion, but I also purchased a standard bearer and an additional knight. While I don’t have any actual plans for these, I just had to pick them up due to nostalgia:  I loved them so much back when they were released, but they were completely unaffordable to me. I just bought the riders, btw, because there is no more room for those terrible, generic 90s plastic horses in my life. But as you can see, the new chaos knight horses work like a treat with the older metal models.

And finally, another lucky discovery:

Lucky purchase (8)
The Dark Emissary from the Albion campaign. This guy was re-released in Finecast a while back and is still available. But finding him in a pile of shoddily painted Hormagaunts was still a rather nice surprise!

I’ll spare you the piles of Catachan, Night Goblin and generic Space Marine bitz that were also part of the bundle: Much of this stuff will come in handy sooner or later, but it lacks the appeal of the highlights shown above 😉

In addition to the models, I also picked up some older 40k related books:

Lucky purchase (11)
From left to right: The 40k 3rd and 4th edition big rulebooks (believe it or not, I have never owned those until now), one of the hallowed Chapter Approved compendiums (containing wonderful but somewhat outdated Index Astartes articles on the creation of Space Marines, Dreadnoughts, Librarians and on various chapters and legions: Dark Angels, Emperor’s Children, Iron Warriors, White Scars & Flesh Tearers) and Codex: Witch Hunters (obviously a must for any fan of the Inquisition).

All of these are in excellent condition, and I suspect the old 40k source books will merit a more detailed writeup in the not too distant future…

So yeah, quite a haul! I am immensely pleased, both with the stuff I did and didn’t buy: By sheer force of will, I resisted the urge to just grab the whole, enormous box — although my restraint made me miss a mint 2002 Games Day Chaos Champion which my colleague Annie later picked up (*sigh*). And I did find a 1998 Games Day Female Commissar, but pointed it out to the owner of my FLGS, since I knew that, as an avid IG player, he would probably be extremely interested in the model — I was right 🙂

But even beyond the stuff I purchased (at a very good – albeit not unreasonable – price, by the way), digging through the various strata of the boxes served as a trip down memory lane. Before long, me and the owner of the store were exchanging old hobby tales and thinking back on innocent days long past. Good times 😉

Anyway, so much for a very nice, hobby-related surprise! And wherever the original owners of these models may be now (in this world or in the warp), they may rest assured that their lead and plastic have found a good home with me!

As always, thanks for looking and stay tuned for more!

Making bigger things out of foamcore, pt. 2

Posted in 40k, DIY, Terrain with tags , , , , , , , , , on June 12, 2013 by krautscientist

So what about that monument temple made from foamcore I talked about last week? Let’s find out!

Here’s where we left off last time: The basic assembly is complete and the building has been undercoated in black:

Monument Temple (19)
While everything was drying, I decided to work a bit on the actual monument that was to go inside the temple. For ease of assembly and added flexibility, I wanted the monument to be removable. Here’s the early construction I did for the monument:

Monument Temple (3)
As you can see, it consists of a column that sits in a small basin (later to be filled with water). The basic construction was, once again, done using foamcore. A cardboard loo roll would have worked as well to make up a column, but I wanted a different look this time, so I went for a rectangular faomcore construction instead. Two square WFB base was used for the abacus atop the column. That way, I could be sure it would be easy enough to attach the actual statue to the column later.

The statue itself consists of bitz from the Cadian Command Squad. I decided that I wanted the monument to have been erected in honour of the brave Imperial Guard, so I built a guard standard bearer in parade uniform for the monument — a very straigthforward affair. The model was kept separate from the rest of the monument for now.

Afterwards, the column and basin were undercoated, using the same texture paint I had used for the rest of the building. Here’s the monument after undercoating:

Monument Temple (13)
I then used cheap grey spraypaint (picked up at the DIY superstore) to make the monument look like it was actually made of stone. Take care not to apply too much colour during this step, because some of the darker undercoat showing through in places will actually make the piece look more believable.

Then I thought about how to best represent muddy water in the shallow basin at the bottom of the column. Since this was only a one-off project, I didn’t want to spend money on a huge bottle of water effect, so I had to develop a plan B. In the end, feeling slightly adventurous, I mixed PVA glue with a bit of water that I had in turn couloured using a mix of brown and green hues (mainly GW Gretchin Green, GW Scorched Brown, and some GW Rakarth Flesh). The resulting mix was then poured into the basin — if you’re trying something similar, make sure the basin’s actually waterproof and the stuff doesn’t come out at the seams! The mix also has to be thick enough, so use quite a lot of glue! The water’s mainly there to add the colour and to make everything slightly more fluid.

Here’s the monument after that step: As you can see, the water ended up suitably brackish and dirty — just as planned. I also added some plastic plants that I spraypainted brown to make them look dried and withered.

Guard Monument (1)
The monument was then set aside to allow for the “water” to dry. This took about 24 hours for this relatively shallow basin, so resist poking it to see whether is has managed to set yet! I actually couldn’t wait and made a (very small) indetation into the surface that way. Trust me: You need to be patient for this!

In the end, the “water” ended up looking nicely brackish and with a glossy surface, making it look reasonably realistic. I would have loved the mix to retain some of the glue’s usual transparence, but alas, it was not to be. Still, definitely better than getting some expensive water effect for a simple one shot!

I then painted the actual statue, which was really very easy: The model was undercoated with GW Chaos Black spray, then basecoated with a 60/40 mix of GW Chaos Black and Vallejo Halcon Turquoise. Then I drybrushed the model with a 50/50 mix of GW Skull White and Halcon Turquoise. The raised detail on the regimental flag lent itself especially well to this technique.

Here’s the result:

Guard Monument (7)
Guard Monument (6)
Monument Temple (40)
As you can see, the statue’s surface looks like heavily oxidised metal, just like you might see on a real-life statues you might see in your vincinity. All in all, I was very pleased with the effect. The statue was glued to the column using superglue. And with that, the monument was finished.

Here it is, placed in its eventual spot in the yet unfinished building:

Monument Temple (21)
While I had worked on the statue, the rest of the building had had ample time to dry. So the next step was to add slightly thinned down PVA glue to the nooks and crannies of the building. Then a mix of sand and smaller stones was added on top to represent rubble:

Monument Temple (22)
You can really add lots and lots of the stuff for added realism, plus segments of fallen walls and ceilings. Personally, I tend to go for a less realistic result simply because it’s pretty hard to add multiple layers of rubble and make sure they stay in place. And too much rubble and uneven surface texture can also mean it will be hard to actually place your models in the building during games.

Anyway, a second coat of thinned-down glue was added on top to seal the rubble. Then the rubble areas were sprayed once again with black.

After everything was dry, the building was sprayed with the same grey paint I had used on the monument. Again, go for a slightly uneven approach to create plausible shades and a more realistic looking surface.

Almost done now:

Monument Temple (23)
I also painted the inscription, using one of my regular GW brushes. The letters were undercoated in chaos black, then painted with Vallejo Tinny Tin, then washed with GW Agrax Earthshade. Then I added some light accents, using GW Dwarf Bronze.  And finally, I added a thinned-down mix of Vallejo Halcon Turquoise and GW Skull White on top to represent verdigris:

Monument Temple (28)
And with that, the building was basically finished. Here’s a view from the side:

Monument Temple (30)
I used the grey spraypaint to add some additional accents where necessary. This only took a couple of minutes, though. Here’s the finished monument temple:

Monument Temple (33)
Monument Temple (34)
Monument Temple (35)
Monument Temple (36)
And some additional detail shots of the statue:

Monument Temple (32)
Monument Temple (31)
Looking back now, there’s quite a bit that could still be added: It might look cool to drybrush the tiled floor with white to pick out the contours. Posters and propaganda proclamations could be added to the building, as well as blood splatters, additional damage etc. I am still free to do all of this, however, as the finished build should be easy enough to modify.

Anyway, as you can see, building and painting this monument temple was almost as easy as constructing one of the easier ruined buildings. The scope of the project may be different, sure, but in the end, the techniques are the same. If anything, a larger buildings will give you far more options for adding details and little setpieces- Just make sure you don’t add so much stuff that the terrain piece no longer works during games 😉

To wind up this post, here are some impressions of Inquisitor Antrecht’s warband moving through the ruin, to give you an idea of the scale:

Monument Temple (38)
Monument Temple (39)
In any case, I hope I was succesful in showing you how easy it can be to come up with a centre piece for your gaming table. All C&C are welcome, of course: Just let me know what you think in the comments section!

And, as always, thanks for looking and stay tuned for more!

Monument Temple (41)

Making bigger things out of foamcore, pt. 1

Posted in 40k, DIY, Terrain with tags , , , , , , , , , on June 5, 2013 by krautscientist

It’s been quite a while since I last posted about building terrain, but since the weather has picked up considerably in the meantime, it is now time once more to go outside, hit the tool shed or garage and build some wargaming terrain!

The funny thing is that I am pretty spoiled when it comes to terrain nowadays: There’s some exquisite terrain over at the FLGS, and stuff like Neil101’s stellar Arrke board, most of the stuff used during this years Inqvitational or Chelnov’s unbelievable Sisyphus Complex have taught me that my own meagre efforts at building terrain are already outdated by a pretty huge margin. I am also pretty convinced that I could do better nowadays, but some of my early recipes should still have some merit, especially to those of you who have been putting off building their own terrain for one reason or another.

I already discussed quite a while ago how easy it is to make some reasonably convincing ruined buildings out of foamcore. Buildings like those will also allow you to fill up quite a huge gaming table. But you probably don’t want your entire terrain collection to consist of simple, bombed out hab blocks, do you? Well, here’s the good news: Building bigger and more sophisticated structures can be almost as easy. This two-part post will take a closer look at that!

Everything started with my desire to build a larger building that was to serve as some kind of centrepiece on the table: I wanted something decidedly bigger than one of my ruined hab blocks, but maybe not quite as gigantic as a cathedral. So I decided to try my hand at a temple-like building housing a monument to some glorious achievement or other of the Imperium of Man.

The great thing about this project was that the building’s basic construction was still very much a rectangular box with four walls meeting at a 90 degrees angle. Still, the building ended up looking pretty imposing nonetheless. Take a look:

Monument Temple (2)
The most impressive part of the building is its façade, but this part was actually pretty easy to get right: I just drew a suitably impressive design on a piece of 3mm strong foamcore, then cut out all the arches and recesses with an exacto knife. Pieces of the same thin foamcore were then used to add projections to the wall and give it some depth. And I also added an inscription using alphabet noodles.

Here’s a view that shows the rest of the building:

Monument Temple (1)
The side walls are a very easy construction, with just a number of archways cut out of the foamcore I used. And a thicker kind of foamcore was used as a base for the whole building. The whole construction was very easy to put together, using PVA glue.

The dome you can see on the roof of the building was a readymade styrofoam shape I bought for a song at the DIY superstore. I placed it to be exactly above the monument inside the temple, a mockup of which you can see here:

Monument Temple (3)
In order to make the building look suitably damaged from artillery fire and the ravages of war, I cut sections out of the side walls and dome. Pieces of the dome were then glued onto the floor of the building, to make it look like they had fallen when the dome was partly destroyed.

The most fiddly part of the basic construction was the floor: I cut a lot of identical square shapes from the cardboard of a cereal box and used them as stone tiles to make up the temple’s floor. Glueing them down took a while:

Monument Temple (5)
As you can see, I drew some lines around the damaged wall sections to mark the areas where the floor had been damaged as well. On these areas, I didn’t use any of the floor tiles or at least made sure they looked damaged enough.

Monument Temple (4)
I also made sure the roof would be removable, in order to facilitate access to the building’s interior. This was achieved by adding a very simple foamcore construction underneath the roof that was stable enough to carry the roof when it was placed on top.

Here’s the interior with the floor tiles in place. The empty area in the middle marks the spot where the removable monument is supposed to go:

Monument Temple (6)

You can also see a part of the construction holding the roof in place at the bottom of the picture.

And here’s the same space with the monument’s basic construction in place:

Monument Temple (7)
So the next step was to get the whole building undercoated — definitely the hardest part of the whole exercise! I prepared a suitable undercoat by mixing black and white acrylic paint, some PVA glue and some fine bird sand (to add some texture to the paint and make the building look less like it’s made of foamcore). This kind of paint is really easy to mix and very cheap too. It also works as a sealant, making sure the foamcore’s foam interior doesn’t melt away, once you start using spray paint at a later point.

I won’t lie to you: Getting a building this size undercoated takes some doing (and a pretty large brush). And, please, don’t go using your expensive Citadel brushes for this, you hear!

Here’s the building, partly undercoated:

Monument Temple (8)

Monument Temple (9)
Oh, and another important thing: Make sure to mix enough paint, because there’s nothing worse than having to make some more just for the last corner of the model — I am speaking from experience here… 😉

Anyway, this is what the building looked like after undercoating:

Monument Temple (15)
Monument Temple (14)
Monument Temple (16)
Monument Temple (17)
As you can see, I didn’t paint the areas with the inscription or the empty spot for the monument. This was due to a number of reasons, actually:
I was afraid to damage the inscription with the brush, for one, plus you don’t want any grains of bird sand on those letters: They will have to look like metal later on, so any residue from the texture paint would destroy the illusion. The empty space was left unpainted because the monument should be easy to place, and that wouldn’t work with the floor all roughened up and uneven from the texture paint.

So the final step was to use black spray paint to touch up the unpainted areas as well as any places where the white foamcore was still showing through. This only took a couple of minutes. Afterwards, the whole building was nice and black:

Monument Temple (18)
Monument Temple (19)
And with that, the basic construction was completed. In the next installment, we’ll look at the additional details, the construction of the monument itself and the rest of the paintjob.

Until then, as always, thanks for looking and stay tuned for more!

Orkheim Ultraz: Meet da Team!

Posted in Conversions, Orcs & Goblins, paintjob with tags , , , , , , , , , , , on April 24, 2013 by krautscientist

So while we were dealing with the Arrke and Khorne’s Eternal Hunt, what have those Greenskins been up to, I wonder?

Good news regarding the Orkheim Ultraz: This rather unassuming Lineman was the last model to be painted for the initial team roster to be completed:

BB last Lineman (1)
BB last Lineman (3)
BB last Lineman (2)
BB last Lineman (4)
Not a particularly impressive member of the team, to be sure. Just another Orc trying his best to catch a ball that is too damn clever 😉

The model was still significant, though, since putting the last brush strokes on this guy meant I finally head a playable team! Yay! Let’s take a closer at the finished models:

Thrower:

BB Thrower (2)

Linemen:

BB Linemen (2)

Blitzers:

BB Blitzers (2)

Black Orc Blockers:

BB Blockers (1)

And, of course, Les Gobboz:

BB Gobboz (2)
I was really pretty fast this time, mostly painting these guys in pairs. So now the Orkheim Ultraz are ready to face their first game. Here’s the whole team for you:

BB Team (3)
BB Team (2)

So does this mark the end of this particular hobby endeavour? No way! For starters, I have to tell you that I cannot recall when I last had so much fun painting models, so I will eagerly jump at the opportunity to get some more Ultraz finished. But what’s in the cards for the team?

Well, first we will have to see how these guys are doing in an actual game. More on that soon! Then there is couple of models yet to be added: First of all, the fan/cheerleader models I have already built as well as the team’s “Kit Git”. Several people have also advised me to add two more Black Orcs to the team, and from what little I understand of the rules, I am tempted to agree (it helps that the models are so cool, of course…). Then I’ll probably build and paint one additional thrower and lineman, respectively, just to be on the safe side. I also recently purchased a WFB plastic feral Orc Waaghboss to convert a suitably brutal looking star player. And I love the new plastic trolls, so adding one of those (and another one to my soon to be Mordheim warband) certainly isn’t out of the question. And there’s always the fact that rumours of a new edition of Blood Bowl hitting the shelves later this year have begun to surface, so there’s that to consider as well…

Anyway, all of that is still in the future. For now, let’s get these guys broken in and bloodied for the first time on an actual Blood Bowl pitch. I’ll get back to you shortly to tell you how that went…

Until then, let me hear all the C&C you can think of! And, as always, thanks for looking and stay tuned for more!
Orkheim Ultraz Teaser_lores