Something big, pt. 2: A bit of progress and some additional musings
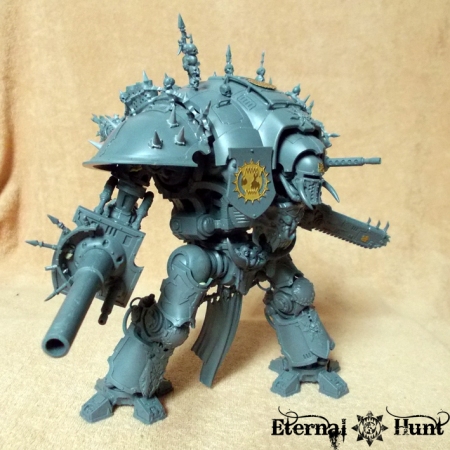
Work on my Chaos Knight continues apace: I have finally started to build the model’s second arm, and have also added some additional bitz and bobs here and there. The Knight is now rapidly approaching completion, and I think it shows:
What I really like about the model right now is that, while it’s still clearly identifiable as a Knight Titan, the various chaotic details and added armour have managed to alter the model’s silhouette quite a bit. Let’s have a look at a couple of different angles:


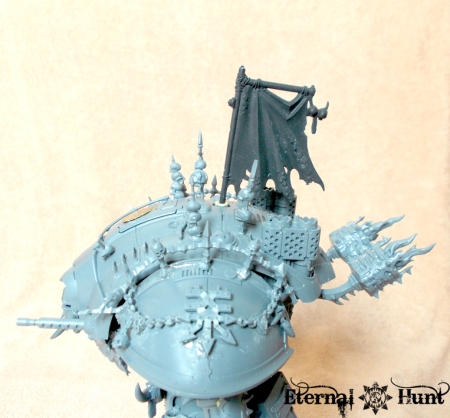
As you can see in the pictures below, the braziers from the warshrine kit were added to the Knight’s back:


I would have loved to use these to replace (or complement) the Knight’s regular exhausts, but that would have rendered the top carapace plate impossible to take off, and I really wanted to keep it flexible (so one can take a closer look at Baron Harrowthorne in his cockpit and the engine block). So the only compromise left to me was to add them to the Knight’s back at an angle that wouldn’t interfere with the carapace. That said, I don’t actually see them as braziers so much, but rather as extra exhausts that are there to vent some heat/warp energy/whatever when the Knight goes into overdrive mode.


As you can see in the pictures, I also added some bitz to the right shoulder pad at last. While the left one already sports a huge icon of Khorne, I want to use a World Eaters decal on the right one:

Of course this means that whatever I wanted to add to the pad at this point must not interfere with the position of the decal, which complicated things a bit. I tacked some spikes in the area surrounding the space where the decal will be:

Since I rather liked the effect, the spikes have already been glued to the shoulder pad:

I may still add some additional detail on top of the decal at some point — a chain of dangling skull trophies, for example. However, I will only be able to sort this out once the model has been painted.
I also realised by sheer coincidence that the standard from the Ogre Mournfang Cavalry would actually make a pretty cool banner for the Knight:


That hole at the centre of the carapace certainly looks like it was intended for something like this! One thing I will need to do, however, is to add some kind of chaos icon to the top of the banner in order to give it a more distinct visual footprint when seen from the front:

I am not sure whether I like this element enough to make it a permanent addition to the model, but it might be a fun optional bit, to be added whenever I feel like it? We’ll see…
All those small additions notwithstanding, I am very aware that there’s a danger of overcluttering the model which would make it lose visual coherency. Therefore, I will try to restrain myself and only add a couple of bitz to the weapon arms in order to tie them together with the rest of the model. And then it’s time to call this conversion finished and get this big boy painted, I guess – a prospect that fills me with equal parts anticipation and dread, to be honest…
One thing I realised is how this model – and the last two years in the hobby, really – have changed my outlook on conversion projects, especially when it comes to big models:
When I got back into the hobby in 2010, I was mostly used to working with regular, infantry sized models. A Terminator seemed huge to me back then, and I remember that converting and painting my first Dreadnought seemed like an enormous undertaking. Then came a Defiler, a Basilisk, a Heldrake, the Wargrinder, and, lastly, the Knight, and without even noticing it, I grew more and more comfortable working with bigger models.
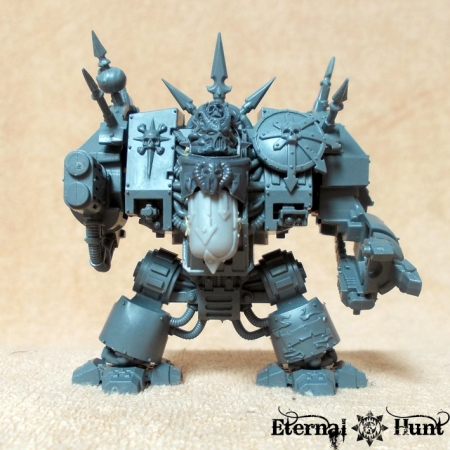
Now when I recently picked up a Black Reach Dreadnought in an ebay auction, I realised that it took me about fifteen minutes of messing around with a couple of bitz to produce something that would have taken me ages to complete a couple of years ago:

Now this guy is very, very WIP at the moment, and none of this has been glued together yet. In fact, I am not even sure whether the completed Dread will end up looking like this or completely different. I am just showing it to you to illustrate my point: That things that used to feel like the absolute pinnacle of my hobby achievements can now be accomplished in a short break between working on bigger things — a pretty cool feeling, actually 😉
So, I would be very interested in hearing any feedback on my Chaos Knight you might have! Just drop me a comment!
And, as always, thanks for looking and stay tuned for more!

EDIT: David Grundy raised an excellent point in the comments about the “white space” above the Knight’s head, created by the too clean armour plate. I started working on that area right away, using some leftover parts from the warhshrine kit. Take a look:


Not only does the armour plate appear less empty and clean now, but the decoration also repeats a visual element that already appears on the model (on the shoulder pads, to be precise). Cheers for pointing this out, David! Hope you like the solution! 😉
Related
This entry was posted on July 23, 2014 at 09:00 and is filed under 40k, Chaos, Conversions, Fluff, WIP, World Eaters with tags 40k, background, baron harrowthorne, chaos, chaos knight, chaos space marines, conversion, Dreadnought, imperial knight, khorne, khorne's eternal hunt, kitbash, knight titan, WIP, world eaters. You can follow any responses to this entry through the RSS 2.0 feed. You can leave a response, or trackback from your own site.
25 Responses to “Something big, pt. 2: A bit of progress and some additional musings”
Leave a reply to Dave Taylor Cancel reply
This site uses Akismet to reduce spam. Learn how your comment data is processed.


July 23, 2014 at 09:20
I am not very sure about that extra Chaos star at the top of the banner, it looks like overkill. You have already adorned the Knight with fitting icons I think.
Speaking of bits, just how many spares do you have to kitbash multiple models like this? Or do you order them every time you start a project?
July 23, 2014 at 16:58
Cheers, mate!
Like I said, the banner’s only optional. I like the Knight well enough without it, so that will be the standard look.
As for spares, I do of course collect all kinds of chaos bitz in order to have a stash I can use when a conversion comes up. Banners, trophies and the likes are rather easy to come by, as part of bitz swaps, for instance. It’s the rare and complex stuff that’s far harder to get hold of: Specific heads, armour plates from bigger creatures or warmachines etc. In those cases, I usually turn to ebay or ask some of my fellow hobbyists for help 😉
July 23, 2014 at 10:03
Looking great so far, excellent work as always.
On the front of the model’s top carapace plate you’ve got the model equivalent of ‘white space’ it seem to draw my eye oddly to just above the head. I’m wondering is some card chaos trim might work nicely there to break up the smooth surface and act as a frame for the head as the focal point.
July 23, 2014 at 16:59
You raise an excellent point! I started working on that area right away and will update the post accordingly 😉
July 23, 2014 at 10:08
Some chains with skulls and/or rotting heads/bodyparts dangling from the main gun – or from the gun to the body – would be nice.
Or chains hanging from the bottom of the carapace (with hooks, like the ones from that WFB Lord on Manticore) – not as a cape, just a couple of groups of chains. But fine chains, so there’s variety in thickness in them – more fun to paint and more visual interesting bits. Also some small spikes (like enlarged studs really) on the lower left leg to offset the ones on the right shoulder would add to the model. Instead of the icon on the forehead, a large central horn would also make the knight look more brutal. And some more spikes, linked with small chains, on the top carapace. Why the chains? The fine chains would break up the silhouette and make the spikes look less wobbly. Some crucified loyalist on top would be nice too. Guess it’s a little game of adding symmetry to certain parts, while counterbalancing it with asymmetrical parts.
But that’s just my 5 cents on an – already – outstanding model
😉
July 23, 2014 at 17:00
Cheers, mate! Those are some very good suggestions, particularly when it comes to the chains and the studs on the shin armour — I’ll definitely look into it! No central horn on the head, though, that just seems too Nurgl-y for my taste 😉
July 23, 2014 at 14:30
I am really enjoying this. Once it is painted up, it will be a fitting warshrine to the god of War!
I know how you feel by the way when it comes to huge models. When I started, I remember a dreadnought seemed huge and a scorpion defiler conversion took me days to complete. Now, I can turn out a scorpion in a couple hours from box to built.
It is nice to reflect on your own development and being one that regularly looks to your blog for inspiration, I have seen you grow by leaps in bounds these last couple of years.
July 23, 2014 at 17:01
Cheers, TJ! It almost seems ridiculous how afraid I was of my first Dreadnought conversion in hindsight 😉 And thanks for the compliment! Coming from you, that means a lot!
July 23, 2014 at 15:15
I think it’s looking great as it is. I’m not sure I’d add too much more. One think I would suggest is moving the braziers at the back. At the moment they look like he should be moving forward very quickly.
I’d love to see them spliced into the actual exhaust cowlings (i.e.. replacing one of the two large pipes on the op of each side). This way they have a plausible reason for being there, and the smoke/fire will be pointing up, working well with the more sedate pace of the Knight.
Just my thoughts, keep up the great work : )
Cheers
Dave
July 23, 2014 at 17:02
Cheers, Dave!
Like I said in the post, I would have loved to use the braziers like that, but then the top plate wouldn’t have stayed removable, and being able to take it off was really important to me. Using the braziers that way (and at that angle) was really the only compromise I could think of, to be honest.
July 25, 2014 at 19:51
My bad, mate. I must have missed that comment as I pored over the photos of your Knight. All good then. Now I’m keen to see him painted : )
July 23, 2014 at 17:52
Great work! I really need to get hold of my own knight. Looks like tons of fun kitbashing one of these!
July 23, 2014 at 18:00
Cheers, man! I really wouldn’t have thought so before, but it really is fun! The Knight is an extremely well planned kit that is astonishingly easy to put together.
July 24, 2014 at 14:21
I keep thinking that the horns on the head are somewhat… small. But that might only be me. Have you considered the horns from the Gorebeast chariot? Though they might collide with the cables…
July 24, 2014 at 14:38
Cheers, Adam! I have indeed considered those horns — and several more, as it happens. All of them ended up looking slightly silly and restricting the heads movement in a rather unrealistic way. I even tried adding them to the carapace above the head, but that turned out to be even more of a problem. So I eventually decided to go with a less noticeable, yet more realistic version.
July 25, 2014 at 17:27
Hey!
I actually saw the model (well, not yours obviously,,) for the first time today and could see that those horns are pretty much too big and bulky for the face. I think I had imagined the whole model to be larger… 🙂
July 25, 2014 at 15:43
[…] A blog about KrautScientist's wargaming exploits « Something big, pt. 2: A bit of progress and some additional musings […]
August 7, 2014 at 19:09
[…] of my very own Chaos Knight. As you may remember, the overall conversion was basically finished last time, so only a bit of detail work […]
January 20, 2015 at 18:01
[…] Until then, why not check out my posts on the creation of my Chaos Knight Titan here and here? […]
May 5, 2015 at 16:46
[…] it to those loyalist dogs! 😉 The ETL provides me with the perfet incentive for finally painting my Chaos Knight conversion — at long […]
June 4, 2015 at 03:42
Your work is and continues to be an absolute inspiration. Loving all the chaos conversions and that knight is a total gem – great great stuff sir – always look forward to seeing more 🙂
June 4, 2015 at 14:12
Thanks a lot, Stephen! That is very nice of you to say! 🙂
July 29, 2015 at 18:47
[…] is what the finished conversion looked like (the entire project so far has been chronicled here and here, for your […]
October 12, 2015 at 14:35
[…] I PART II PART […]
April 18, 2016 at 18:54
[…] I PART II PART […]